Winter Accessories for Emma – Pattern

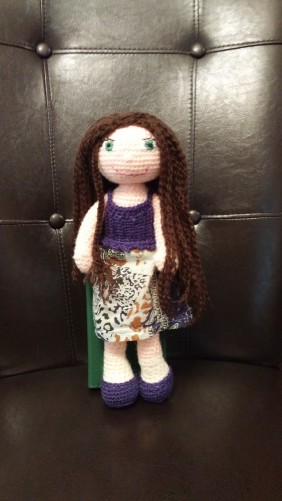
Today’s post is the patterns for the hat, scarf, and mittens that I posted for Emma last week.

wp-image-1299533053jpeg.jpeg

These will fit an Emma doll made with a 3mm hook. If you use a 2.5mm hook for the doll I’d suggest using a smaller hook or a finer yarn. It doesn’t really matter for the scarf but with the hat and mitts you might want to try them on as you go to make ure they will fit.

This pattern is available as a free pdf download from my ravely page at: http://www.ravelry.com/patterns/library/winter-accessories-for-emma

Hook size: 5.5mm

Yarn: worsted weight (4)


Scarf

chain  58

row 1: (dc, ch 1, sc) in 3rd ch from hook, * sk 2 ch,(dc, ch 1, sc)in next ch* repeat stitches between *s to end of ch, turn

row 2: ch 1, *(dc, ch 1, sc) in ch space* repeat stitches between *s to end of row

Fasten Off


Mittens x2

Worked in joined rounds.

Rnd 1: 6 sc in magic circle, join with a sl st (6)

Rnd 2: ch 1, 2 sc in each sc around, join with a sl st (12)

Rnd 3: ch 1, sc around, join with a sl st (12)

Rnd 4: ch 1, *sc2tog, sc in next 2 sc* repeat twice, join with a sl st (9)

Switch from working in rounds to working in rows.

Row 5: ch 3, sc in 2nd ch from hook and next ch, sc2tog in next 2 st from previous round

Row 6: sc in each sc from previous row

Row 7 – 15: repeat rows 5 & 6 to end of round

sl st edges together

Fasten Off


Hat

Worked in joined rounds.

Rnd 1:12 dc in magic ring, join (12)

Rnd 2: ch 2, 2 dc in each dc, join (24)

Rnd 3: ch 2, *2 dc in next dc, 1 dc in next dc* repeat to end of round, join (36)

Rnd 4: ch 2, dc in each dc to end of round (36)

Switch from working in rounds to working in rows.

Row 5: ch 5, sc in 2nd ch from hook and next 3ch, sc2tog in next 2 st from round 4

Row 6: sc in each sc from previous row

Row 7: repeat rows 5 & 6 to end of round

sl st edges together

Fasten Off


That’s it. They’re pretty simple and quick to make. Coming soon: a jacket! 🙂

My Latest Doll + A Dress Pattern

Here is my latest doll. I posted her as one of my works in progress last month. It took just a little bit longer to finish her than I was hoping but she’s done now. She doesn’t have a name yet as that will be up to her recipient.

Her dress is made the same way as Alice’s and I’ve finally written out a pattern for it. The pattern is posted below the picture. It is also available as a PDF download on Ravelry.

If you try it out and find any errors please let me know. I try to make them as accurate as possible but I know what I mean to do so… J

20161015_202854

Hook size: 3mm or 3.5 mm (if the doll was made with a 2.5mm hook, use a 3mm hook for the dress. If the doll was made with a 3mm hook, use a 3.5mm hook for the dress)

Yarn: Fingering or sock weight yarn (size 1). I used Loops and Threads Woolike.

Stitches used:

  • ch: chain
  • sc: Single crochet
  • hdc: half double crochet
  • dc: double crochet
  • sl st: slip stitch
  • picot: chain 3, slip stitch into first chain
  • sc2tog: decrease – single crochet two together


Main body of dress

Ch 21

Work R 1 – 8 in rows.

R 1: sc in second ch from hook and each ch across (20)

R 2: ch 1, turn, 2 sc in each sc (40)

R 3: ch 1, turn, *1 sc in next sc, 2 sc in next sc* repeat to end of row (60)

R 4: ch 1, turn, sc in each sc (60)

R 5: ch 1, turn, sc in next 7 sc, skip 16, sc in next 14 sc, skip 16, sc in remaining 7 sc (28)

R 6: ch 1, turn, sc across (28)

R 7: ch 1, turn, hdc in each sc (28)

R 8: ch 2, turn, dc in each hdc, join with sl st to first stitch of row (not the top of the chain) (28)

Work Rnd 9 – 17 in joined rounds.

Rnd 9: ch 2, *dc in next dc, 2 dc in next dc* repeat to end of round, join (42)

Rnd 10: ch 2, *2 dc in first dc, dc in next dc* repeat to end of round, join (63)

Rnd 11: ch 2, *2 dc in first dc, dc in next 2 dc* repeat to end of round, join (84)

Rnd 12: ch 2, dc in next 84 dc, join (84)

Rnd 13-15: repeat rnd 12

Rnd 16: ch 1, sc in next 84 dc, join, (84)

Optional edging:

If switching color for edging, fasten off and join new colour.

Rnd 17: ch 1, *sc, picot, sc in next sc* repeat to end of round, fasten off (84 sc, 42 picots)

Join main dress colour to top corner at back of dress.

Ch 1, sc down opening (7 sc) then *2 sc in next 2 sc, ch 3* repeat twice, 1 sc at top of opening, fasten off.

The chain 3’s create button holes. Sew three buttons to the opposite side of the opening.

Sleeves

Join main dress colour to under arm facing the wrong way.

4 sc across under arm, ch 1, turn

Work these rounds in a continuous spiral.

Rnd 1: sc around arm hole (20)

Rnd 2 – 6: Repeat rnd 1 (20)

Rnd 7: *sc2tog, sc in next 3 sc* repeat 3 times, fasten off (16)

Optional edging:

Rnd 8: Join edging color, ch 1, *sc, ch 3, sc in next 2 sc*, repeat to end of round (16 sc)

Repeat directions for other sleeve.

Belt (optional)

Ch 80 and fasten off.

Run the chain through the first dc row, starting and ending at the back.


Dice Bag Pattern

Here is the basic pattern for the bags in my last post. Any stitch can be used as long as it’s tight enough to not leave big holes in the bag. For the Jack-o-lantern I did most of the rounds in hdc to keep the surface fairly even.

20161013_194003

Stitches used:

sc: single crochet

hdc: half double crochet

dc: double crochet

rsc: reverse single crochet (also known as crab stitch)

Work rounds 1 to 5 in a continuous spiral

Rnd 1: 6 SC in a magic ring (6)

Rnd 2: 2 sc in each sc (12)

Rnd: 3 *2 sc in next sc, 1 sc in next sc* 6 times (18)

Rnd 4: * 2 sc in next sc, 1 sc in next 2 sc* 6 times (24)

Rnd 5: *2 sc in next sc, 1 sc in next 3 sc* 6 times (30)

Switch to joined rounds

Rnd 6: sc in BLO of each sc, join (30)

Rnd 7: ch 1, sc in each sc, join (30)

Rnd 8: ch 1, sc in each sc, join (30)

Rnd 9: ch 1, hdc in each sc, join (30)

Rnd 10: ch 1, hdc in third loop of each sc, join (30)

Rnd 11: ch 1, sc in third loop of each sc, join (30)

Rnd12: ch 1, hdc in each sc, join (30)

Rnd 13: ch 1, hdc in each sc, join (30)

Rnd 14: ch 1, hdc in third loop of each sc, join (30)

Rnd 15: ch 1, sc in third loop of each sc, join (30)

Rnd16: ch 1, sc in each sc, join (30)

Rnd 17: ch 1, sc in BLO of each sc, join (30)

Rnd 19: ch 1, hdc in each sc, join (30)

Rnd 20: ch 1, hdc in third loop of each sc, join (30)

Rnd 21: ch 1, dc in each hdc, join (30)

Rnd 22: ch 1, sc in each sc, join (30)

Optional Rnd 23: ch 1, rsc in each sc, (30)

Fasten Off

Run a drawstring between dcs

Emma Doll Pattern

It’s been almost a week since my first post so I guess it’s time for another one. I’m hoping to do at least two posts a week from now on. We’ll see if I can stick to that…
Anyway, today’s post is the pattern for the Emma the Elf doll from last week. It’s just the doll, not any of the clothes. I will eventually post clothes as well but I’m still trying to write down patterns. The problem with just winging it when you make something is coming back to it later and trying to figure out what the heck you did. 🙂
So, without any more rambling, here is the pattern for Emma:

20160902_152259

Yarn: weight 3 (I use Paton’s Astra)
Hook: 2.5 – 3 mm ( I used a 3mm hook for Emma)

Doll will be approximately 26 cm (10 inches) tall.

Stitches used:
Single crochet (sc)
Increase
Decrease
Bobble stitch

To make a bobble stitch: Yarn over (YO), hook through sc, YO, pull through sc, YO, pull through 2 loop on hook – 2 loops remain on hook
YO, hook through same sc, YO, pull through sc, YO, pull through 2 loops – 3 loops remain on hook
YO, hook through same sc, YO, pull through sc, YO, pull through 2 loops – 4 loops remain on hook
YO, pull through all 4 loops
All rounds (r) are worked in continuous, not joined, rounds. Use a stitch marker to mark the first stitch of the round and move it up every round.

Head
r1: 6 sc in magic ring (6)
r2: 2 sc in each sc (12)
r3: *2 sc in sc, 1 sc in next sc* until end of round (18)
r4: *2 sc in sc, 1 sc in next 2 sc* until end of round (24)
r5: 1 sc in first sc, *2 sc in next sc, 1 sc in next 3 sc* until one stitch before end of round, 1 sc in last 2 sc (30)
r6: *2 sc in sc, 1 sc in next 4 sc* until end of round (36)
r7: 1 sc in first 3 sc, *2 sc in next sc, 1 sc in next 5 sc* until two stitches before end of round, 1 sc in last2 sc (42)
r8: *2 sc in sc, 1 sc in next 6 sc* until end of round (48)
r9: *2sc in sc, 1 sc in next 7 sc* until end of round (54)
r10-16: 1 sc in each sc (54)
If you are using safety eyes, attach them around row 10 or 11 before you start decreasing.
r17: *1 dec, 1 sc in next 7 sc* until end of round (48)
r18: *1 dec, 1 sc in next 6 sc* until end of round (42)
r19: 1 sc in first 3 sc, *1 dec, 1 sc in next 5 sc* until 2 stitches before end of round, 1 sc in last 2 sc (36)
r20: *1 dec, 1 sc in next 4 sc* until end of round (30)
r21: 1 sc in first sc, *1 dec, 1 sc in next 3 sc* until 2 stitches before end of round, 1 sc in last 2 sc (24)
r22: *1 dec, 1 sc in next 2 sc* until end of round (18)
r23: *1 dec, 1 sc in next sc* until end of round (12)
Fasten off (FO)
Stuff the head firmly, embroider face, and set aside.

Legs (Make 2)

r1: chain 5, sc in 2nd chain fr hook and next 2 chains, 2 sc in 4th chain, sc in next 3 chains, 2 sc in last chain (10)
r2: 2 sc in each sc (20)
place stitch marker at 1st and 10th stitch
r3: 1 sc in first sc, 2 sc in next sc, 1 sc in each chain to stitch before marker, 2 sc in stitch before marker, 1 sc in 10th stitch, 2 sc in next stitch, in sc in each stitch to stitch before marker, 2 sc in last stitch (24)
r3-4: 1 sc in each sc (24)
r5: 1 sc in next 6 sc, 6 decreases (dec), 1 sc in last 6 sc (18)
r6: 1 sc in next 3 sc, 6 dec, 3 sc in last 3 sc (12)
r7-10: 1 sc in each sc (12)
switch color if you want the doll to have permanent socks
r11: in back loop only (BLO) 1 sc in each sc (12)
r12-32: 1 sc in each sc (12)
FO
Stuff leg firmly.

Body

with underwear color join legs with a slip stitch (sl st) in two sc (one on each leg) , sc around outside of legs skipping slip stitch (22)
r1: sc in next sc, 2 sc in next sc, sc in next 17 sc, 2 sc in next sc, sc in last sc (24)
r2: *2 sc in sc, 1 sc in 3 next sc* until end of round (30)
r3-6: 1 sc in each sc (30)
switch color
r7 in BLO 1 sc in each sc (30)
r8-16: 1 sc in each sc (30)
r17: *1 dec, 1 sc in next 3 sc* until end of round (24)
r18: *1 dec, 1 sc in next 2 sc* until end of round (18)
r19: * 1 dec, 1 sc in next sc* until end of round (12)
Stuff body.
r20-24: 1 sc in each sc (12)
Stuff neck.
r25: 6 dec, close neck (6)
FO

Arms (x2)

r1: 4 sc in magic ring (4)
r2: 2 sc in each sc (8)
r3: *2 sc in sc, 1 sc in next sc* until end of round(12)
r4: 1 sc in each sc (12)
r5: (1 dec, 1 sc in next sc* twice, bobble stitch in next sc, sc in next sc, 1 dec in next sc, 1 sc in next 2 sc (9)
r6-22: 1 sc in each sc (9)
FO
Stuff arms.

Sew arms to body at row 17.
Attach head to neck. Part of the neck should go inside the head so it is actually attached at around round 22. You can sew the head or go here for a really awesome tutorial on how to attach the head so it can be turned.